

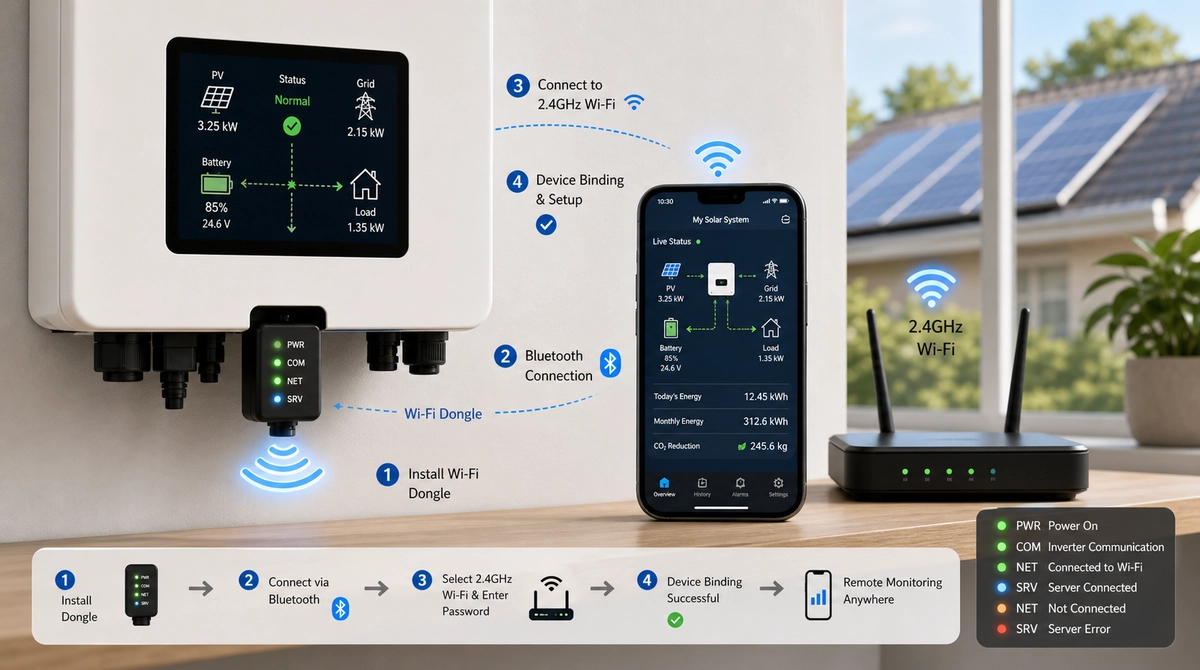
The inverter is installed, the panels are producing, and the app shows nothing. If that’s where you are, this guide will get your Techfine solar inverter onto Wi-Fi in about ten minutes: download the Solar of Things app, register, run Wi-Fi Configuration over Bluetooth, and bind the device.
We also cover the part most guides skip: what to do when the connection fails, using the app’s diagnostic tool and the four LED indicators on the Wi-Fi module.
Key Takeaways
- Setup takes 4 steps in the Solar of Things app: install, register, Wi-Fi Configuration, add device.
- The Wi-Fi module supports 2.4GHz networks only. A 5GHz-only router is the single most common connection failure.
- The PWR, COM, Net, and SRV indicator lights tell you exactly which link in the chain is broken.
- The inverter keeps working without internet; monitoring data resumes uploading when the connection returns.
Why Connect Your Inverter to Wi-Fi at All?
Remote monitoring is mainly an after-sales cost saver: faults show up in the app before anyone drives to site. For a homeowner that means early warning. For installers and distributors, it changes the service economics: one dashboard covers every commissioned unit, and most support questions can be answered by looking at live data instead of scheduling a visit.
Concretely, Wi-Fi monitoring gives you:
- Real-time output data from any location
- Fault alerts pushed to your phone
- Historical charts for sizing and usage decisions
- Remote first-line diagnosis before a site visit
What You Need Before You Start
Four things, all quick to check:
| Item | Detail |
|---|---|
| Monitoring app | “Solar of Things” (iOS / Android) |
| Wi-Fi module | Built into the inverter, or the supplied dongle |
| A 2.4GHz Wi-Fi network | 5GHz-only networks will not work |
| The Wi-Fi password | The module needs it during configuration |
Also confirm the PWR light on the inverter is on. No power, no configuration.
How to Connect a Solar Inverter to Wi-Fi (4 Steps)
Step 1: Download the Solar of Things app
Three ways to get it:
- Scan the QR code on the inverter housing.
- Scan the QR code on the packaging film.
- Search “Solar of Things” in the App Store or Google Play.
Step 2: Register an account
Open the app, tap Sign Up, and register with a working email address. Notifications and fault alerts go to this address, so avoid throwaway accounts, especially if you’re an installer registering on behalf of a customer.
Step 3: Run Wi-Fi Configuration
- Turn on Bluetooth on your phone and open the app.
- Tap Wi-Fi Configuration to enter network setup.
- The app scans for nearby devices. Select your inverter from the list.
- Choose your 2.4GHz Wi-Fi network and enter the password.
When the app confirms the connection, the module’s Net light changes to a slow 3-second flash. That’s your visual confirmation.
Step 4: Add the inverter to your dashboard
Pick whichever method suits the situation:
- Auto detection: tap the + icon top-right, keep the phone near the inverter, select the ID that matches the label on the unit, tap Add.
- Manual addition: choose Manually Add and type in the collector ID and a device name.
- QR code: use Scan Add on the QR label to bind the device automatically.
Check the device ID against the label before confirming. On multi-unit sites this is the step where inverters get bound to the wrong account.
How to Read the Wi-Fi Module’s Indicator Lights
The four LEDs identify which link is broken: power, local communication, router connection, or server connection. Read them in order and you can locate almost any fault without tools.
| Light | State | Meaning |
|---|---|---|
| PWR | On | Power supply normal |
| PWR | Off | No power to module – check inverter power first |
| COM | Flashing (0.3-0.9s) | Data being sent/received with the inverter |
| COM | Steady on | Bidirectional communication established |
| COM | Off | No data exchange with inverter |
| Net | Slow flash (3s) | Connected to your router (STA mode) |
| Net | Fast flash (0.6s) | Not connected to router |
| SRV | On | Connected to the monitoring server |
| SRV | Off | No server connection – check internet, not Wi-Fi |
The order matters. PWR off means nothing else can work. Net flashing fast means the router link failed (wrong password, weak signal, 5GHz). Net fine but SRV off means the router works yet has no internet access.
What If the Inverter Won’t Connect?
Start with the app’s built-in test: open the device settings page and tap Diagnose in the top-right corner. It runs a connection check and suggests fixes for the errors it finds.
If you’d rather work through it manually, these six causes cover most failed connections we see in support requests:
- Router is 5GHz-only. The module needs 2.4GHz. Enable the 2.4GHz band or create a separate 2.4GHz SSID.
- Wrong or changed Wi-Fi password. Re-run Wi-Fi Configuration after any router password change.
- Weak signal at the inverter. Test with your phone standing next to the unit. Walls, metal enclosures, and distance all cut signal. Move the router or add an extender.
- Special characters in the SSID or password. Rename the network to plain letters and numbers if configuration keeps failing.
- Bluetooth permission not granted. The app needs Bluetooth during setup; check phone permissions.
- Outdated firmware or app version. Update both, then retry.
Still stuck after all six? Note which LED state you see and contact our support team with the device ID; that combination usually pinpoints the fault in one reply.
FAQ: Solar Inverter Wi-Fi Connection
Why won’t my solar inverter connect to Wi-Fi?
The most common cause is a 5GHz-only router; the Wi-Fi module requires a 2.4GHz network. After that: wrong password, weak signal at the inverter’s location, or special characters in the network name. Run the app’s Diagnose function first, then work through the six-point checklist above.
Does the inverter stop working if Wi-Fi goes down?
No. Power conversion runs fully offline; Wi-Fi only carries monitoring data. When the connection returns, the app resumes showing live data. Short outages don’t need any action.
Can I monitor several inverters in one app account?
Yes. Add each unit through the same + icon and give each a clear name (site, customer, or serial). Installers commonly run whole fleets of commissioned units under one account, which is what makes remote first-line support practical.
What do I do after changing my router or Wi-Fi password?
Re-run Wi-Fi Configuration (Step 3) with the new network details. The device binding in your account stays intact; only the network link needs to be rebuilt.
Where do I find the device ID?
On the label on the inverter housing or its packaging film. During auto detection, the app also shows a matching screen so you can confirm the ID before binding.
Final Thoughts
Wi-Fi setup on a Techfine inverter is a ten-minute job when the network side cooperates, and the LED table above sorts out the cases when it doesn’t. For deeper reading on interpreting what your inverter tells you, see how to read a solar inverter display and our solar inverter problems and solutions troubleshooting guide; for scheduled upkeep, the solar inverter maintenance tips checklist covers the rest.
You can download the Wi-Fi module installation manual (PDF) for offline reference. Distributors and installers: if you’re evaluating Wi-Fi-enabled hybrid inverters for your market, contact us with your target power range and monthly volume for model recommendations and OEM options.