
A lithium battery that reads a healthy voltage can still be a bad battery. Voltage tells you the state of charge; it says very little about capacity, internal resistance, or how the pack behaves under load. That’s why a proper test has four steps, not one.
This guide walks through all four: a multimeter voltage check (with a voltage-to-SOC chart), a capacity test, a load test, and a self-discharge test. At the end, there’s a section most guides skip: how importers and distributors should spot-check battery shipments at the warehouse.
Key Takeaways
- Voltage alone can’t confirm battery health; you need capacity and load behavior too.
- Know your chemistry first: a “12V” LiFePO4 pack rests near 13.3V when full; a 3-cell li-ion pack is full at about 12.6V.
- LiFePO4’s flat voltage curve makes mid-range SOC readings approximate. Rest the battery 30 minutes before measuring.
- For importers: an incoming-goods check (voltage per sample, 30-day self-discharge, documentation) catches most problems before customers do.
What Are You Actually Testing?
Three numbers describe a lithium battery’s health: voltage (charge state), capacity in ampere-hours (how much energy it still holds), and internal resistance (how gracefully it delivers current). A degraded battery usually fails on the last two long before the first one looks wrong.
One thing to settle before you touch a probe: the chemistry. “Lithium-ion” covers different cell types with different voltages. A 12V-class LiFePO4 pack (4 cells of 3.2V) rests around 13.3V when full. A 3-cell li-ion (NMC) pack is full at roughly 12.6V. Testing one against the other’s chart produces nonsense conclusions. Solar storage batteries, including ours, are almost always LiFePO4, so the numbers below use that chemistry.
Step 1: Voltage Test with a Multimeter
Set the multimeter to DC voltage, put the red probe on the positive terminal and the black probe on negative, and compare the reading against the chart below, after the battery has rested 30 minutes off charge and off load. Measuring right after charging reads high; right after discharge reads low.
Approximate resting voltage to state of charge for a 12V-class LiFePO4 battery:
| State of charge | Resting voltage (12V LiFePO4) |
|---|---|
| 100% | 13.3-13.4V |
| 90% | ~13.3V |
| 70% | ~13.2V |
| 50% | ~13.1V |
| 30% | ~13.0V |
| 20% | ~12.9V |
| 10% | ~12.0V |
| 0% (cut-off) | ~10.0V |
Values are compiled from typical LiFePO4 cell datasheets (3.2V nominal cells, 4-in-series packs); exact figures vary slightly by manufacturer, so treat the mid-range as indicative. Notice how flat the middle of the curve is: between 30% and 90%, barely half a volt separates the readings. That flatness is why voltage alone can’t grade a LiFePO4 battery, and why the BMS estimates SOC from current counting instead (what a BMS does is a separate guide).
Red flags at this step: a pack below 10V (over-discharged, possibly with cell damage), or a large gap between the pack reading and the BMS app reading if the battery has one.
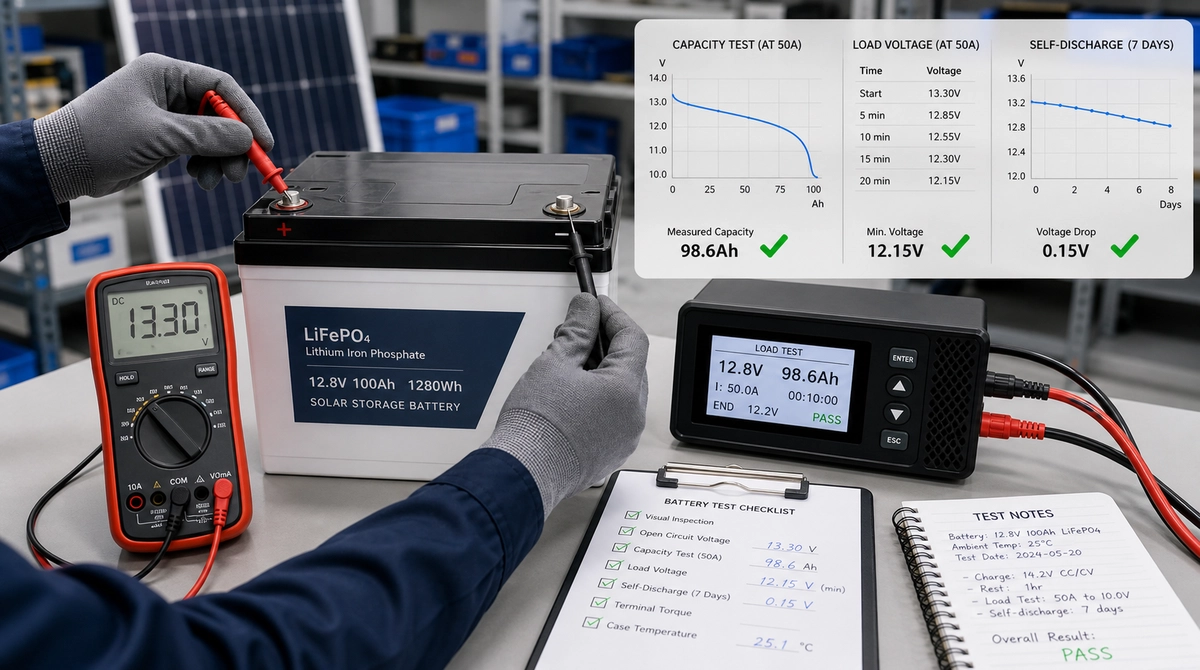
Step 2: Capacity Test
Fully charge the battery, then discharge it at a controlled rate through a capacity tester or a known load, and count the ampere-hours delivered before the low-voltage cut-off. A healthy battery delivers close to its rated capacity; one that quits at 70Ah on a 100Ah label has lost real service life.
Practical notes:
- Use a moderate discharge rate (0.2C-0.5C, meaning 20-50A for a 100Ah pack). Very high rates read lower capacity than the rating fairly.
- Log voltage during the discharge. A pack that sags early but recovers usually has one weak cell group.
- Expect gradual decline over years, not cliffs. A sudden capacity drop after a temperature event or deep discharge deserves investigation, not averaging.
Step 3: Load Test
Connect a load similar to the battery’s real application and watch how far the voltage dips when current starts flowing. A healthy LiFePO4 pack holds voltage firmly under rated load. A rapid, deep sag points to high internal resistance: aging cells, a poor weld, or a failing BMS contact.
Watch temperature at the same time. Terminals or case noticeably heating during a normal-rate discharge is an early warning sign that resistance has climbed somewhere in the pack.
Step 4: Self-Discharge Test
Charge the battery fully, disconnect it completely, store it at room temperature, and re-measure the resting voltage after 2-4 weeks. LiFePO4 self-discharge is slow, commonly cited at a few percent per month. On the chart above, a healthy pack should barely move in a month. A pack that drops from 13.3V into the 12s while sitting disconnected has an internal problem and shouldn’t be deployed.
This is also the cheapest test to run at scale, which is exactly why it belongs in warehouse practice.
Incoming-Goods Checks for Importers and Distributors
You don’t need a lab to catch most battery problems at intake: sample voltage checks, a 30-day shelf test, and paperwork review cover the bulk of real-world failures. In OEM projects we’ve seen distributors turn warranty rates around with nothing more than this routine:
- Sample resting voltage per pallet. Batteries typically ship at partial charge (roughly half, by air/sea transport practice). Whatever the value, it should be consistent across the batch. One outlier pack per pallet is a flag.
- Hold-back shelf test. Keep one unit per shipment disconnected for 30 days, then re-measure. This catches high self-discharge batches early.
- Documentation. Ask the supplier for the UN38.3 transport test summary and cell-level spec sheets, and confirm the BMS parameters (charge/discharge limits, low-temperature cut-off) match what your market needs.
- First-charge behavior. On commissioning, a full charge-discharge cycle on a sample unit verifies capacity against rating before customer installs begin.
Storage conditions between intake and sale affect the test results too; our guide on how to store lithium-ion batteries covers SOC and temperature targets for warehoused stock.
Safety Notes Before You Test
Lithium battery testing is low-risk when the pack is intact, but keep the basics tight:
- Remove rings and metal tools from the work area; a wrench across terminals delivers hundreds of amps.
- Never test a swollen, dented, or leaking pack indoors. Isolate it and follow the supplier’s handling guidance.
- Respect the BMS. If the pack refuses to charge or discharge, the BMS may be protecting against a real fault; bypassing it for testing is how small problems become fires.
- Charge only with a charger matched to the chemistry (LiFePO4 profiles differ from NMC).
For routine care after testing, see the lithium battery maintenance tips, and if you’re comparing chemistries for your product line, the lead-acid vs lithium-ion comparison covers cycle life and cost per kWh.
FAQ: Testing Lithium Batteries
How do I test a lithium battery with a multimeter?
Set the meter to DC volts, rest the battery 30 minutes off charge and load, then measure across the terminals: red probe to positive, black to negative. Compare against the chemistry’s SOC chart. For a 12V LiFePO4 pack, roughly 13.3V means full and anything near 12V means nearly empty.
What voltage means a 12V lithium battery is bad?
A resting voltage below about 10V on a LiFePO4 pack means over-discharge and possible cell damage; below 5V, recovery is unlikely and recharging can be unsafe. But a normal voltage doesn’t prove health. Confirm with a capacity or load test before trusting the pack.
Why does my LiFePO4 battery show the same voltage at 40% and 70%?
That’s the chemistry, not a fault. LiFePO4’s discharge curve is nearly flat through the middle of its range, so resting voltage barely changes between roughly 30% and 90% SOC. Use the BMS readout or a capacity test for accurate mid-range state of charge.
How often should stocked batteries be tested?
For warehoused inventory, re-check resting voltage every 3 months and recharge any unit that has drifted low. Pair that with a 30-day hold-back self-discharge test on each incoming shipment. Batteries stored at sensible SOC and temperature need little else between intake and sale.
Final Thoughts
Test in four layers: voltage for a snapshot, capacity for the truth, load for behavior, and self-discharge for hidden faults. For a distributor, the same four tests scale down into an intake routine that costs an hour per shipment and saves warranty claims later.
Techfine manufactures LiFePO4 batteries alongside its inverter lines, including custom battery configurations for OEM partners: voltage, capacity, BMS parameters, and casing to your specification. Talk to us about your market’s requirements and testing documentation.